


Classic Coleman Tools Parts
Coleman Double End Check Valve Removal Wide Narrow Tool 220b and up USA made by RG
Coleman Double End Check Valve Removal Wide Narrow Tool 220b and up USA made by RG
Couldn't load pickup availability
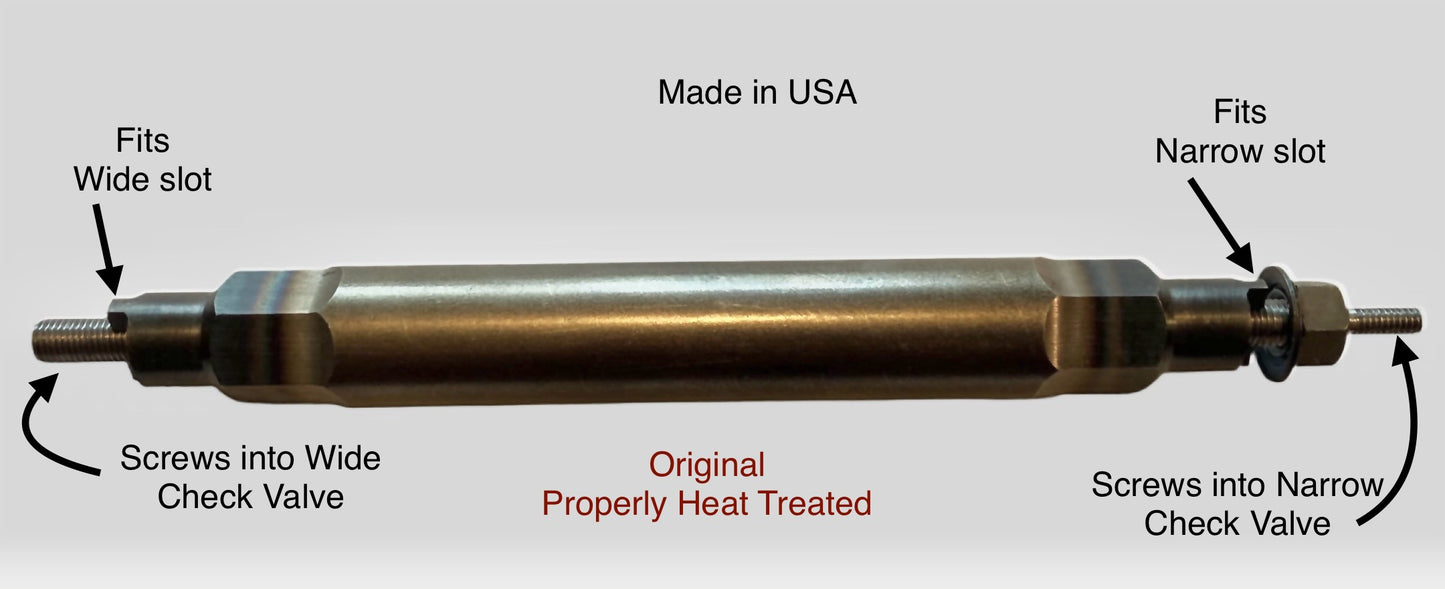
Coleman Lantern Stove Check Valve Removal Wide Narrow slot Tool 220b and up . USA made.
Tool only for sale
Wide / narrow slot tool
Look In the pump well to see the check valve slot
Rod fits both 1/4-32 and 8/32 check valve stems
Nut is 1/4 -32
I have check valves pictured of different types this tool works well with
Fits most Coleman liquid fuel lanterns and camp stoves, also works on Mill Spec lantern in picture and AGM Works with older and newer style wide and narrow slot check valves.
Probably will not work with 242nl or early 242A without the air stem unless held into check valve 220b on up. Check back as I will be offering check valve tools for these.
Also works on AGM without the rods as shown in pics. Use wrench on hex end of removal tool to remove valve.
General Directions for use:
1.Remove the air stem from your lantern's check valve in order to determine which of the two threaded rods to use (8-32 or ¼-32 thread)
2. Hand screw the rod into the check valve at least finger tight. Engage as much thread as possible.
3. Slide the tool down over the rod.
4. Make sure that the ears are fully engaged in the slot.Gently turn the tool until the ears drop into the slots cut in the check valve.
5. Drop a washer onto the rod and then screw on one of the 7/16” nuts (1/4-20 thread) and tighten just enough to eliminate any play in the tool and lock it into place. Caution: Do not over tighten as the brass threads in the check valve may strip!
6. Using adjustable wrench, fit it to the flats on the exposed end of the tube.
7. Hold the fount in a solid grip. If you have a vise, this is a great application for it. Give the wrench a solid turn counterclockwise. Do not side load the wrench. The check valve will loosen and you will be able to remove the entire assembly with the check valve attached.
8. Clean and loosen the ball bearing in the check valve and when free, screw the check valve back into the fount, or use a new replacement valve. Leak test
Be careful not to reinstall the valve too tight! It's also a good idea to lightly coat the tool with oil as it can rust in a damp environment.
Materials
Materials
Shipping & Returns
Shipping & Returns
Dimensions
Dimensions
Care Instructions
Care Instructions